
Building An Author Profile As A Business with Saara Milliken
July 15, 2026
Follow this step-by-step guide to set up your pages perfectly for saddle stitch booklet printing.
So you’ve done the hard work of writing a professional book and saddle stitch binding sounds like the best book binding method for your project. What now? Well, it’s time to turn your book from a digital file, into a print-ready file, which can look a bit different for saddle stitch books.
It’s normal to be a bit intimidated by the thought of designing a professional-looking booklet for commercial print, especially if you’ve only ever printed from a home or office printer. While home printers often require you to lay out your print file pages as spreads, commercial book printing is much simpler than it seems. With Adobe InDesign and the right export settings, you can create a press-ready file that’s a breeze for your professional printer to handle. Follow this step-by-step guide to set up your pages perfectly for saddle stitch booklet printing.
Before we get into the nitty gritty, it’s worth remembering why this book binding type is such a great choice for your project. Saddle stitch is one of the most economical and versatile binding methods available. It uses folded sheets stapled along the spine, making it ideal for magazines, event programs, catalogues, or small booklets. This method is cost-effective, quick to produce, and lays flat when opened—perfect for anything from short-run zines to professional marketing materials.
Pro Tip: Regardless of what book you’re printing, if you’re getting it saddle stitched, always ensure your total page count is divisible by four. This is crucial because saddle stitch booklets are made from folded sheets (each sheet gives you four pages: front and back), so that’s why your total page count must be divisible by four—think 8, 12, 16, 20, and so on. If your page count isn’t divisible by four, you’ll either need to add or remove pages, or your local printer or graphic designer may need to insert blank pages to make it work.
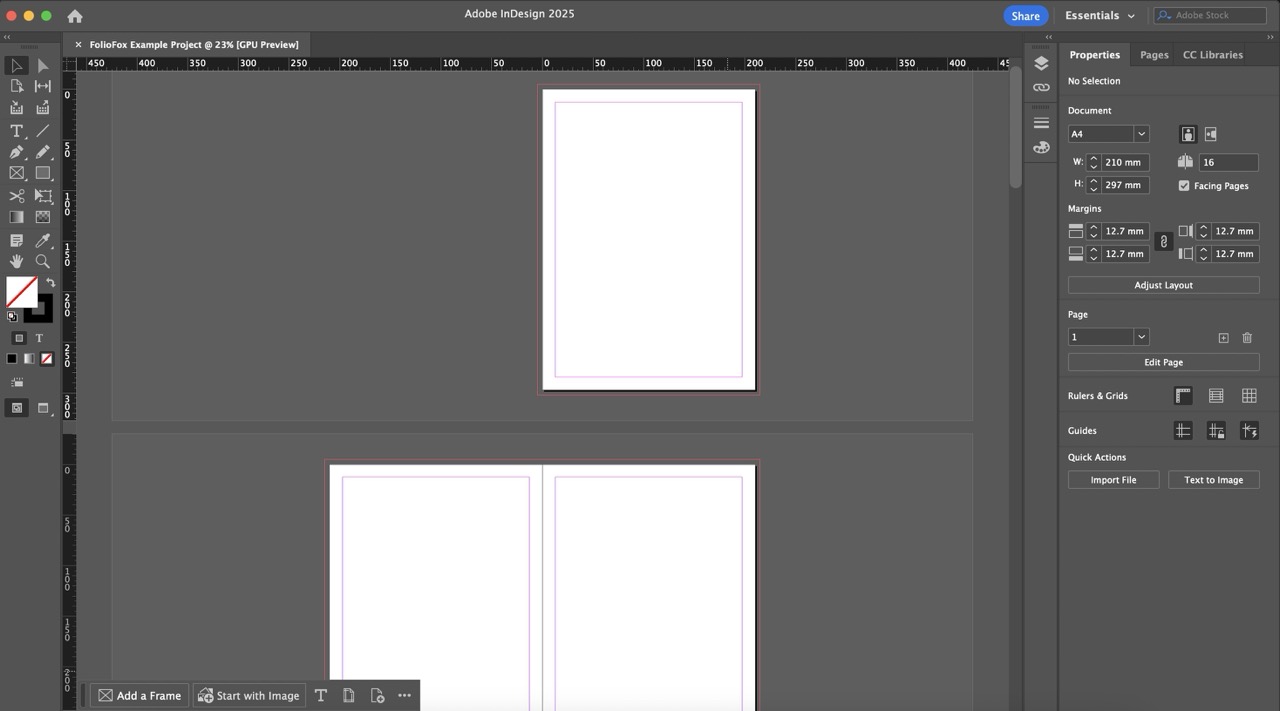
Open Adobe InDesign and start a new document by clicking ‘New file’.
Note: You might already be familiar with some of the set up settings if you’ve already read our print-ready guide online.
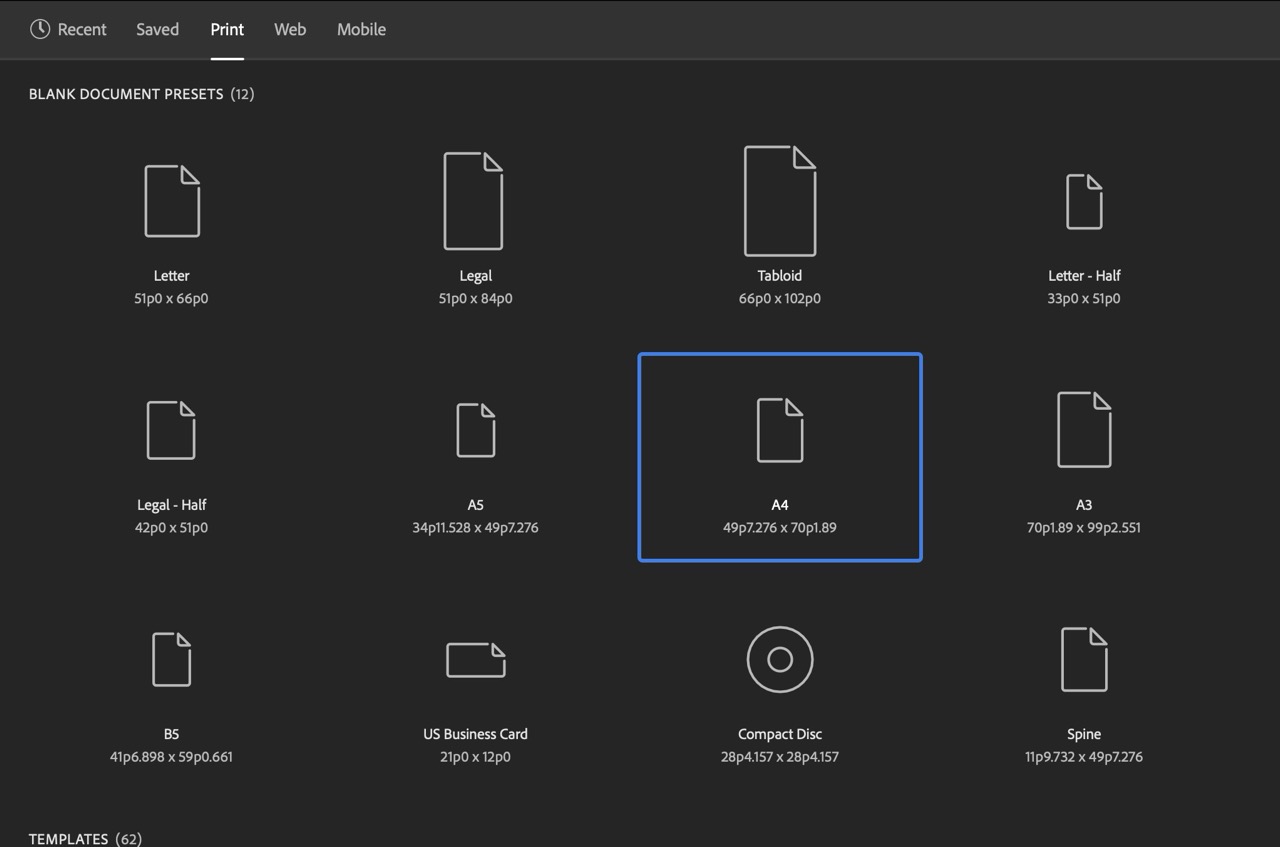
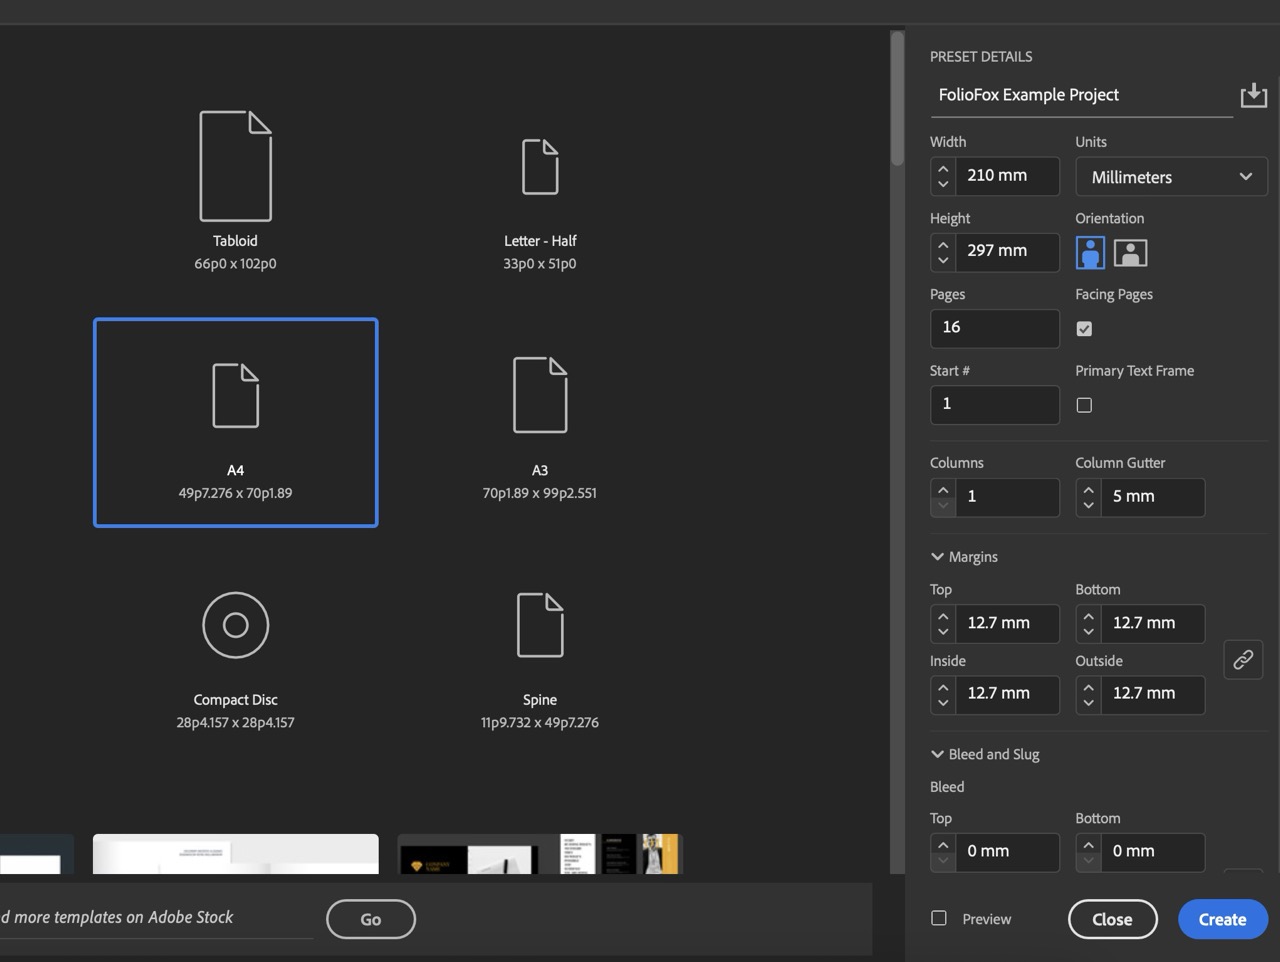
Once you’ve got a new file setup, you’ll want to choose the finish size of your booklet. We recommend always going to the ‘Print’ section, even if you’re printing in a size that’s available under Web or Mobile. Why? Well, because it’ll automatically set your file to CMYK colour mode. This saves you from having to specify this later on.
With these steps, you’ve already:
✅ Set your finish size
✅ Set your colour to CMYK
Next, you’ll need to:
The paper you choose is such an important factor to the final look and feel of your booklet, well before anyone reads a word of what’s inside. There are many different kinds of paper you can use for booklets, with varying textures and feels, so the world is your oyster when it comes to paper stock style and format, however, paper thickness is a more crucial component that can affect how you set up your print file.
The thickness of your pages will determine whether your file will need adjusting for creep. Creep is what happens when the inner pages of a booklet start to extend beyond the outer pages, which can occur when you have a higher page count and/or thicker paper stock. This is an important consideration in general, and can influence your decision on whether to have all pages of your booklet be in the same paper stock (also called a self-cover booklet), or choose a thicker, different paper stock for the cover (also called a plus-cover booklet). Using the same paper stock for all pages makes the printing and production process easier when adjusting for creep (and also on your budget as thicker stock can cost a bit more).
In general, lighter paper stocks in 115-150gsm keep a booklet slim and easy to flip through while still providing excellent colour reproduction. If you want a more substantial feel, we recommend considering a heavier paper stock for the cover (around 250–300 gsm) to instantly increase the booklet’s durability and also add a premium touch.
The standard paper types for you to choose from for any saddle stitch booklet project are:
Choose the paper type that fits the purpose of your booklet and consider how thick the pages will be for when it’s sent to be printed and bound. If you’re unsure, get in touch to chat with one of our printing experts for help.
With the document set up, you can begin placing all the text, images, and design elements for your book’s content as if you were reading a printed copy yourself. When it comes to the page order when they’re facing each other versus how it’ll be printed, don’t worry about trying to arrange the pages. Commercial book printers are there to handle the imposition process, which is the technical rearranging of pages so they print in the correct order once folded and stapled. Simply design the pages in reading order and follow the export process below, and you’ll be good to go!
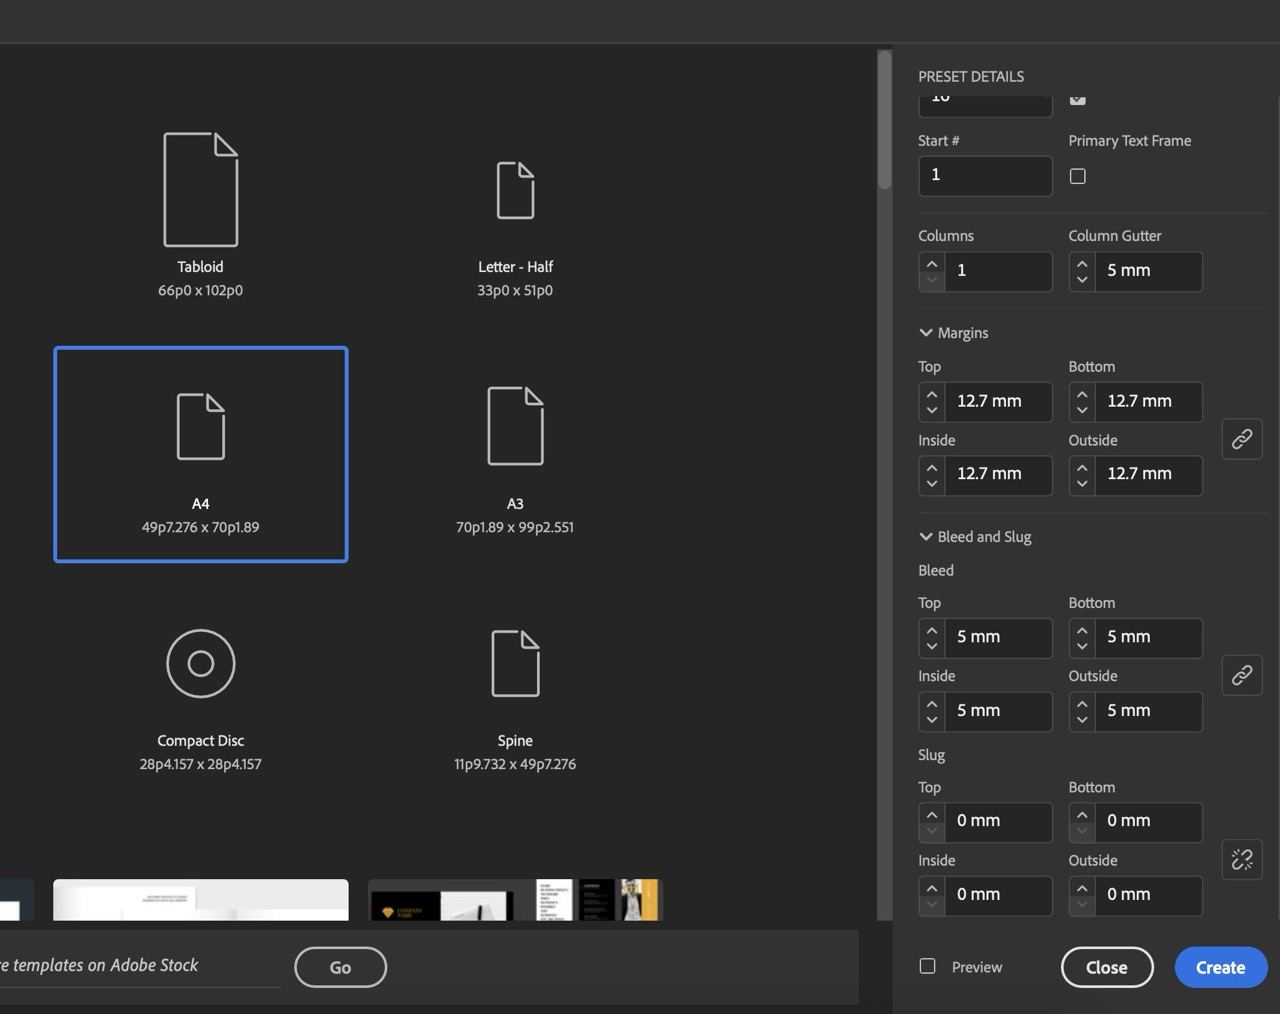
Remember to keep key content inside the margin area (these are usually pink lines/borders inside the page area), and make sure any background images or colours you want printed to the edges of the page are extended right out to the 5mm bleed line (also usually pink lines, but those live outside the white page area) for a polished, edge-to-edge finish.
A thoughtful layout can elevate your booklet from “good” to “great.” Here are a few insider tips:

These small design considerations not only improve readability but also help your booklet look polished and professionally produced.
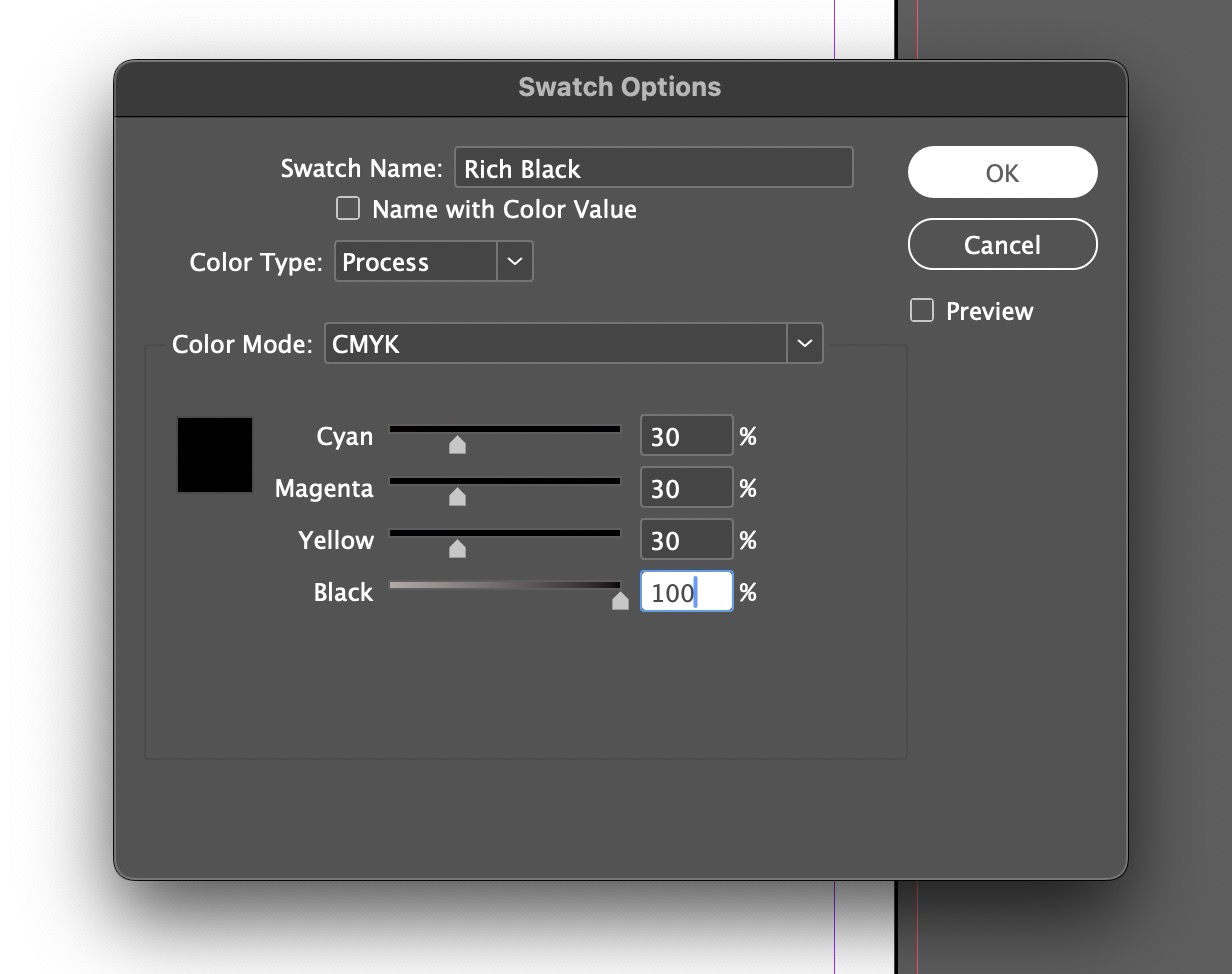
For a deeper, crisp, professional look for dark illustration or text in black, always use Rich Black instead of standard black as the latter can look dull and worn out even when printed on the best printing machines. Rich Black adds depth and richness for a strong, contrasting print, as it incorporates all CMYK inks (C:30% M:30% Y:30% K:100%), rather than just the Black/Registration ink (C:0% M:0% Y:0% K:100%).
To do this, you’ll need to find the Swatches panel, and click the plus icon to create a new swatch. Whether you’re on a text or other element doesn’t matter, as the swatches are applicable across all element types in the document. This might duplicate an existing colour with a name like ‘Black copy’, and if that happens, just double-click on this copy to edit the new swatch.
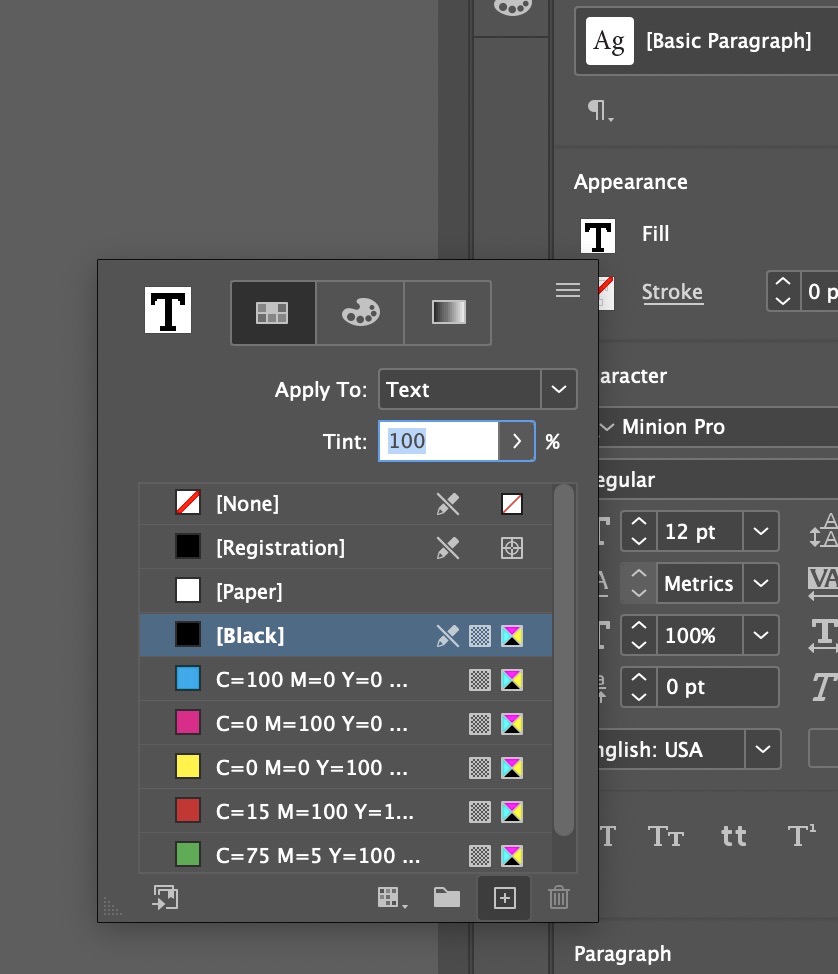
Set the colour to Rich Black using CMYK (you can also rename the colour):
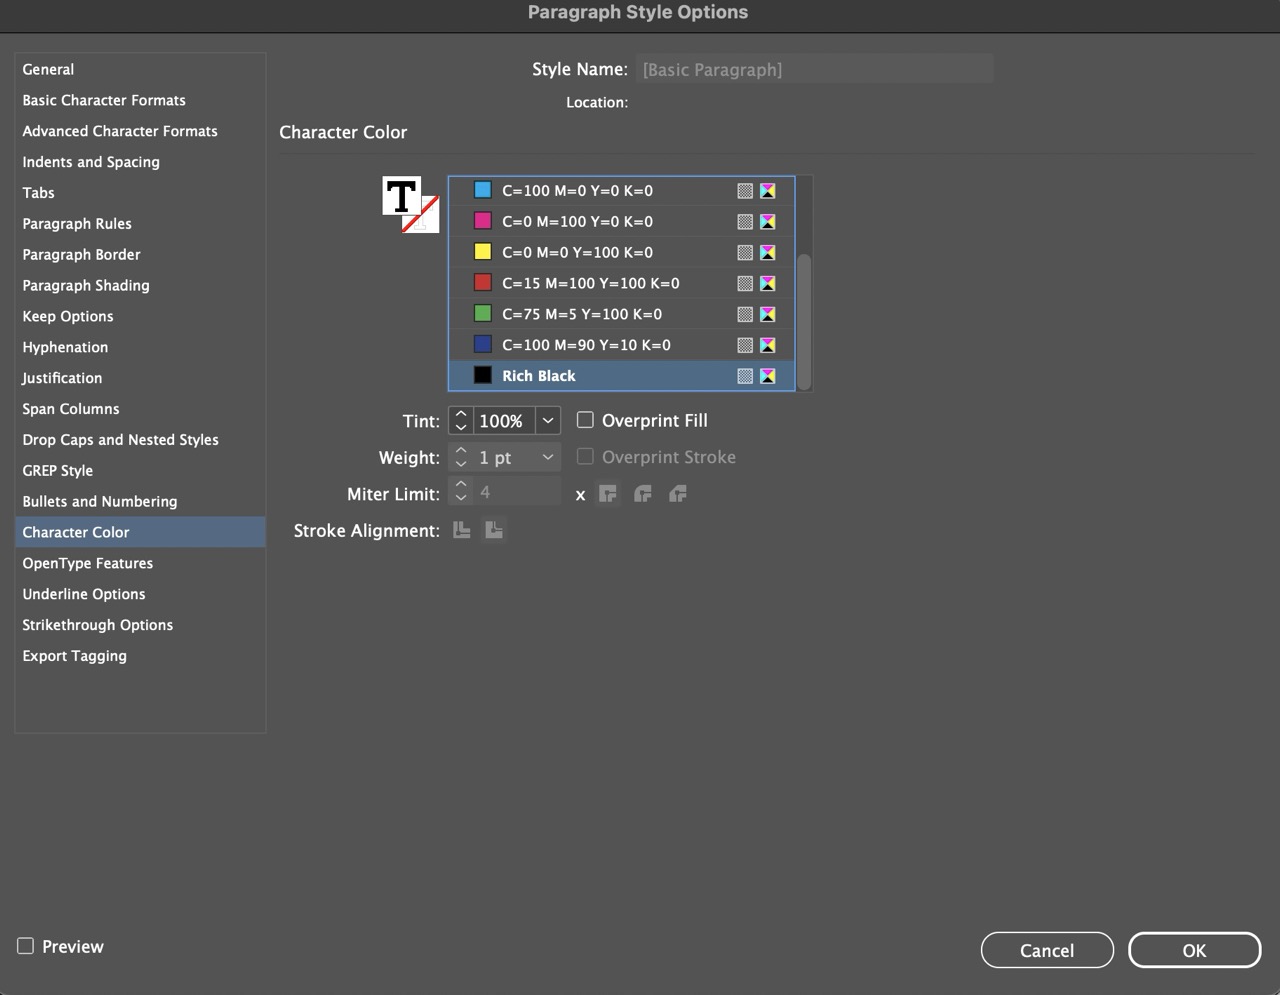
Pro Tip: If most or all of your text is in black, update your Paragraph or Character Styles to quickly change their colour to Rich Black to easily apply this change where it’s needed across your entire document.
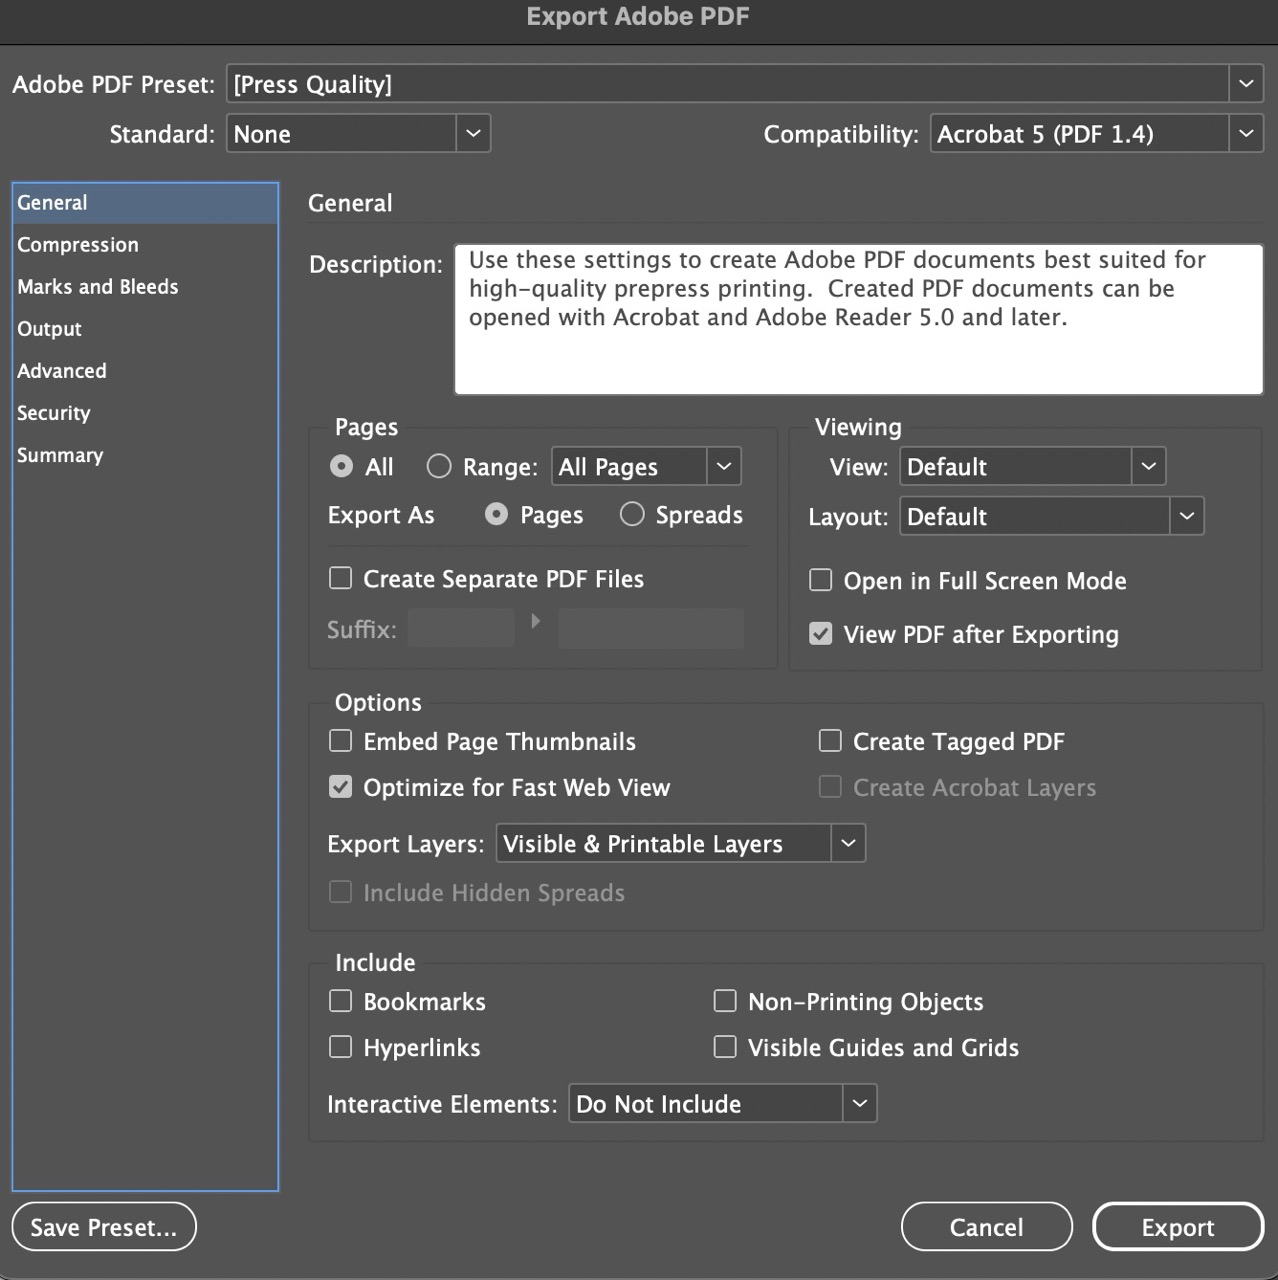
When your design is complete, it’s time to export a print-ready PDF. Go to File > Export and choose Adobe PDF (Print), OR Go to File > Adobe PDF Presets > [Press Quality]...
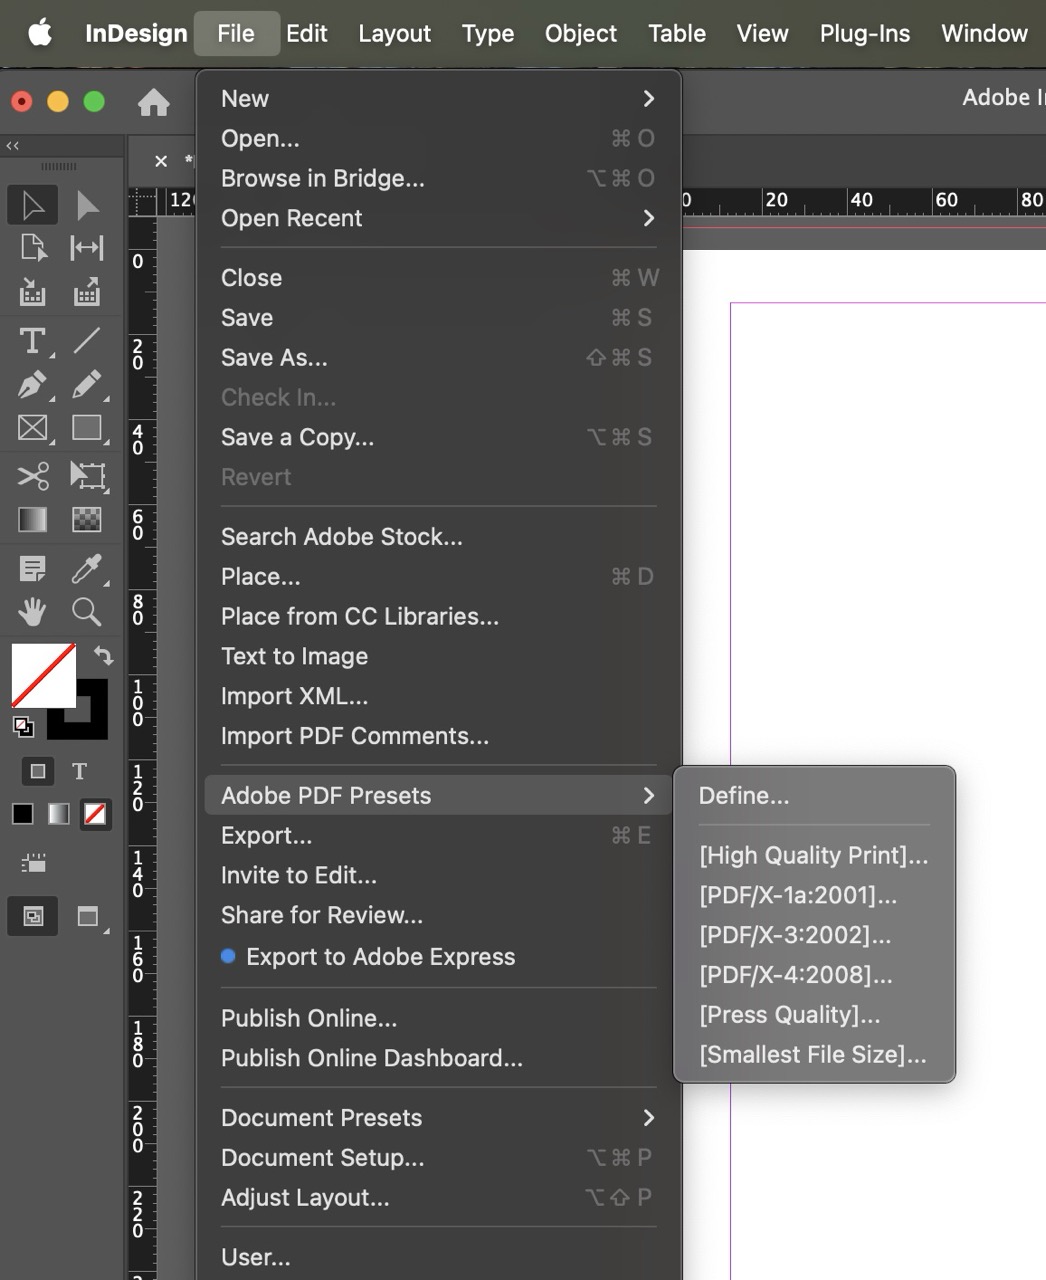
From there, use the following settings:
Under General:
![Screenshot of selecting the Adobe PDF Preset to [Press Quality] during export](https://cdn.prod.website-files.com/6851022dbcefbdb4b78b1d42/68d378860e31de8ce5a783b8_saddle_stitch_file_setup_image10.jpeg)
Under Compression:

Under Marks & Bleed:

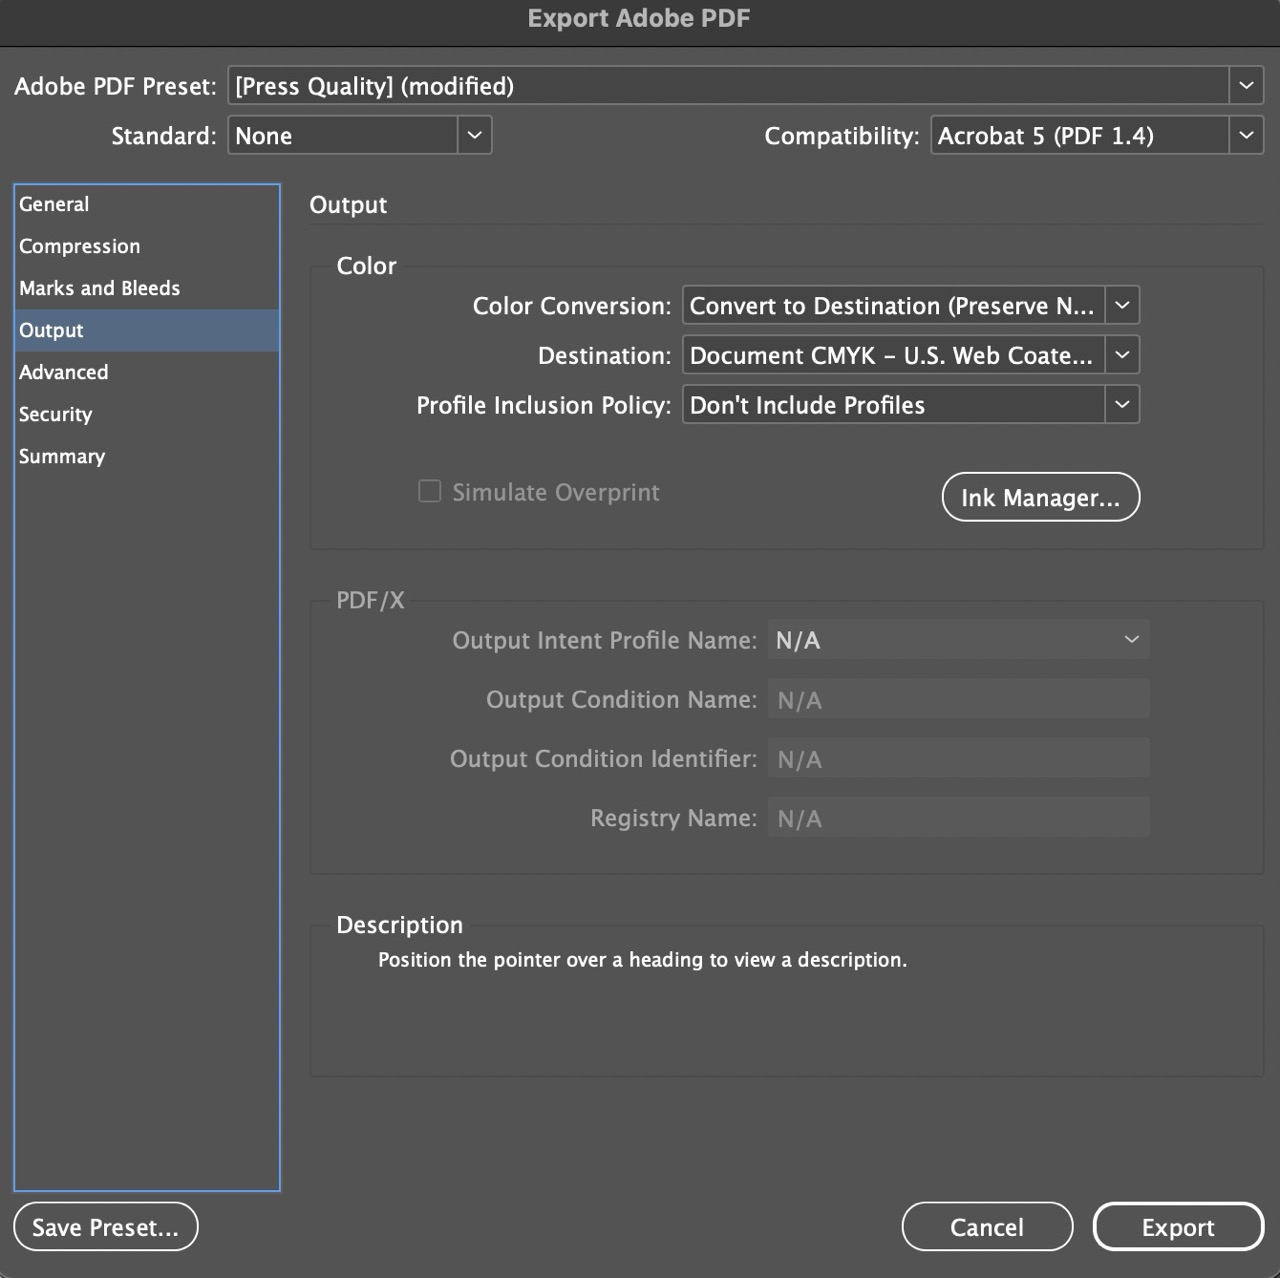
Under Output:
Then, simply click ‘Export’. With your press-ready PDF exported, you’re all set to bring your booklet to life! Get in touch with us if you have any questions or if you’d like to get your project sent to print at a local book printing company in Melbourne.
Written by
Last Updated: