Published on:
•
Last Updated:
Preparing your magazine for print comes with a range of specifications to get right and factors to consider, and Adobe InDesign has long been the industry standard for print publication setup and design. We know that printing jargon and formatting can be a bit confusing, even before considering the learning curve of InDesign if you've never used this software before.
So below, we break down all the essential parts for getting your publication's file set up in InDesign and how to export it once you're done designing your work, so that it's ready for the print!
How To Set Up an InDesign File For a Magazine
Before we get started, it's worth noting that while this guide is for Adobe InDesign, a lot of these steps are transferrable to other professional print design software such as Adobe Illustrator, Affinity Publisher and even entry-level software like Adobe Express or Canva. It might simply take a Google or two to figure out how to apply a specific setting if it's not in the same spot as it is in InDesign.
Choose or configure the size of your magazine
This seems like an easy step, but it's also one that can be easily overlooked if you're overwhelmed by the other options available. No matter what size you want your magazine to be, you want to make sure that your file is set to the correct dimensions so that you're designing for the correct size and it'll be printed in the right size too. It's not always as easy as scaling it up or down later on as different sizes don't have the same ratio.
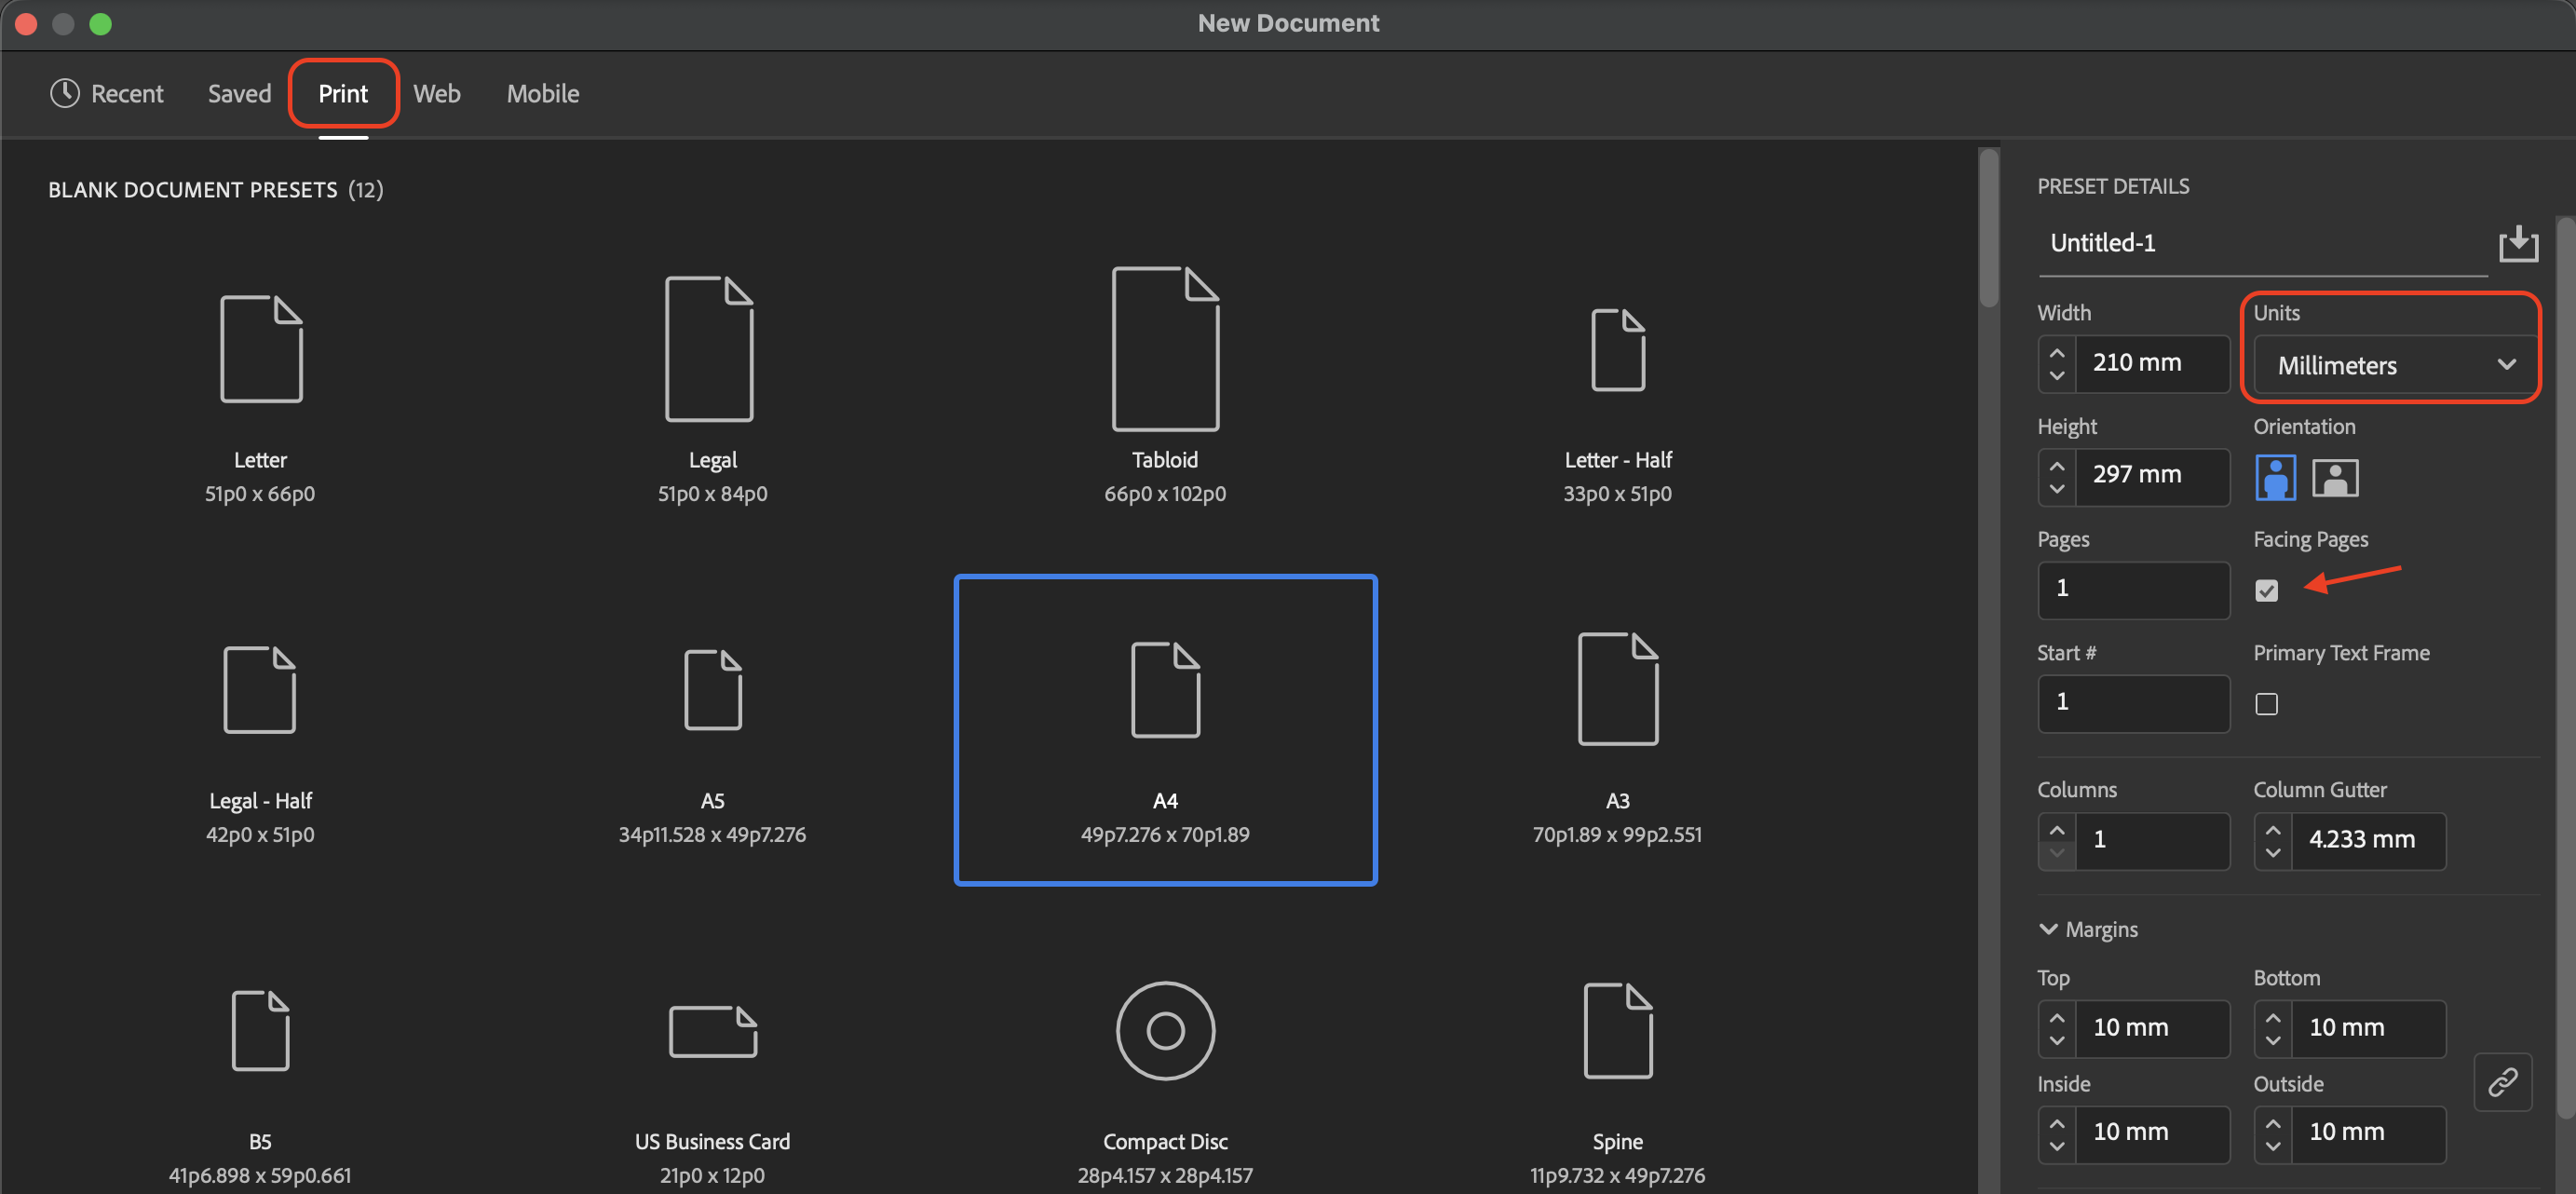
If you're adding in a custom set of dimensions for your magazine trim size, we recommend that you change your measurement unit to millimetres first, as this is the standard unit of measurement for trim sizes in Australia. The default is often set to pica as that is what editorial and print designers traditionally use for multi-page print layout design, because it's helpful for setting up margins, columns and typography. It's still very much used today in publishing and editorial for those uses and can be the unit of measurement you use for your file (you can easily switch it back), as long as the overall dimensions of your publication are correctly converted to the right size in millimetres.
Set up your file in CMYK colour mode
CMYK stands for cyan, magenta, yellow and key (black) - the four colours used by printers. Setting up your file in CMYK in colour mode is paramount when making your InDesign magazine file because it ensures that your finished printed product achieves a true colour match - meaning, the colours are printed as you intend them to be.
A quick tip for this, is that regardless of the size of template you choose when creating a file in InDesign, always opt for a size under the 'Print' tab to automatically set the colour mode to CMYK. If you choose a size under Digital or Social, it will likely default to the digital RGB colour mode (red, blue, green) so you'll need to either update the colour mode intent in the Document Setup setting (under File) and convert your colour swatches (the colours you've used) to CMYK.
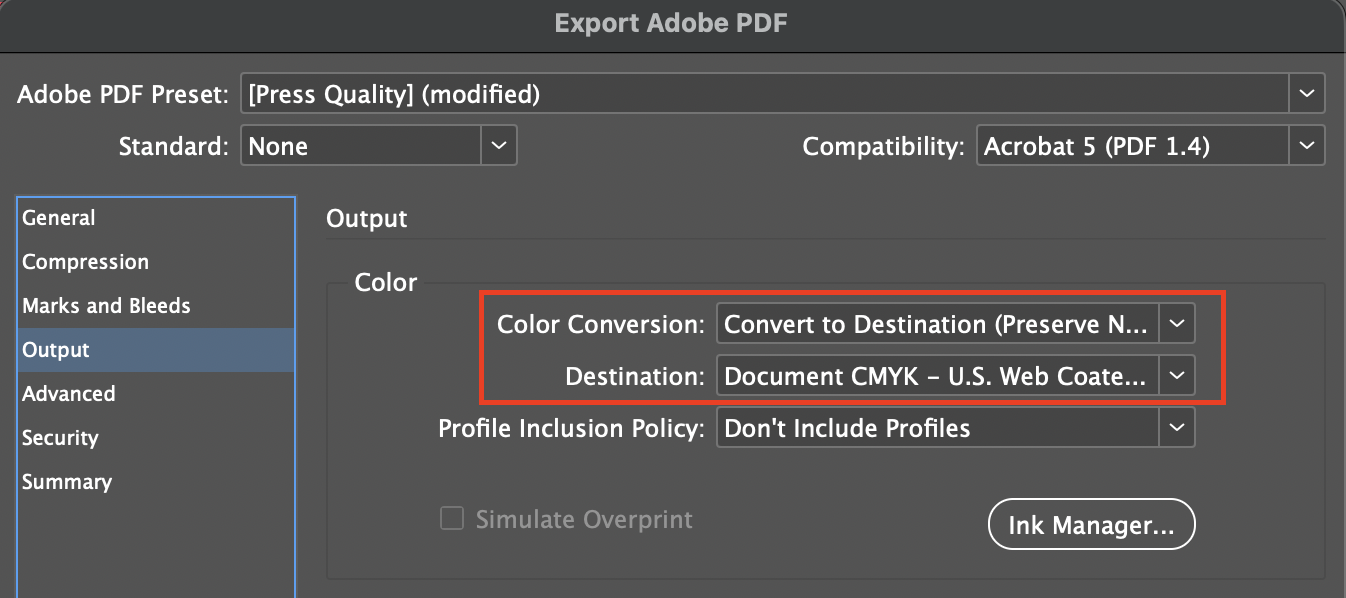
If you already have a file ready for print and are happy with it, you can also convert all the colours to CMYK during export by setting the Color Conversion setting in the Output tab to Convert to Destination, then your preferred profile such as the standard CMYK profile U.S. Web Coated (SWOP) v2 under Destination.
For more info on InDesign colour basics, check out this resource from InDesignSkills.com.
Facing Pages
This setting is next to where you'll decide if your magazine pages will be in landscape or portrait, and how many pages you'd like. Ticking the facing pages option is very handy because it'll create pages that are next to other (except for the first and last page) so that you can design your magazine spreads. What's even better is that this setting won't impact the final artwork if you also need to export the file as separate pages.
Set margins for a content 'Safe Zone'
We always recommend setting and formatting margins to allow enough space (or padding) around the perimeter of your page. This makes sure that you can fit everything you intend on the page without losing any text, images or colour when the page is trimmed to size. This also helps you avoid a border surrounding your content to be too slim or too wide.
Near this option, you can also set up columns to help structure your magazine, as magazines aren't typically designed and read in one big block of text but usually in narrower columns. This makes it easier to read across a wide page, gives you more flexibility to diversity in your spreads and layout design, and it also makes the content feel less overwhelming. The column gutter option is simply how wide you'd like the space between the columns to be.
Configure the bleed
The bleed in printing refers to the extra printed area that goes beyond the edge of the paper size in which your magazine will be printed on. The bleed is important in the printing process as when the paper is cut, the bleed ensures that all of your final publication’s images or text are printed and then all the pages are trimmed to the correct size to match the final size - this is why it's called the trim size!
If bleed isn't setup, other commercial printers might simply enlarge your file to include some bleed and cut off that images or text you might actually want during the trimming process. Another mishap that can happen is when a file has a bleed, however, the images or background colours stop at the trim size and don't extend to the bleed. Despite the printing process being modernised, there is always a risk that when pages are trimmed, they can be trimmed just outside the expected trim size line and that will cause your pages to have a white border. To avoid a white border or losing important content, also keep the important content within your safe zone (margins) and extend background images and colours to the bleed line.
Make sure to configure your print bleed according to your printer's specifications. The amount of bleed will differ across printing companies, but most printers in Australia will request between 3mm and 5mm of bleed; we recommend 5mm just to be safe. If you want to see what the final spread or page will look like after trimming, you can go press W on your keyword to toggle or change the Screen Mode (under Tools) from the normal editing view and a Preview mode.
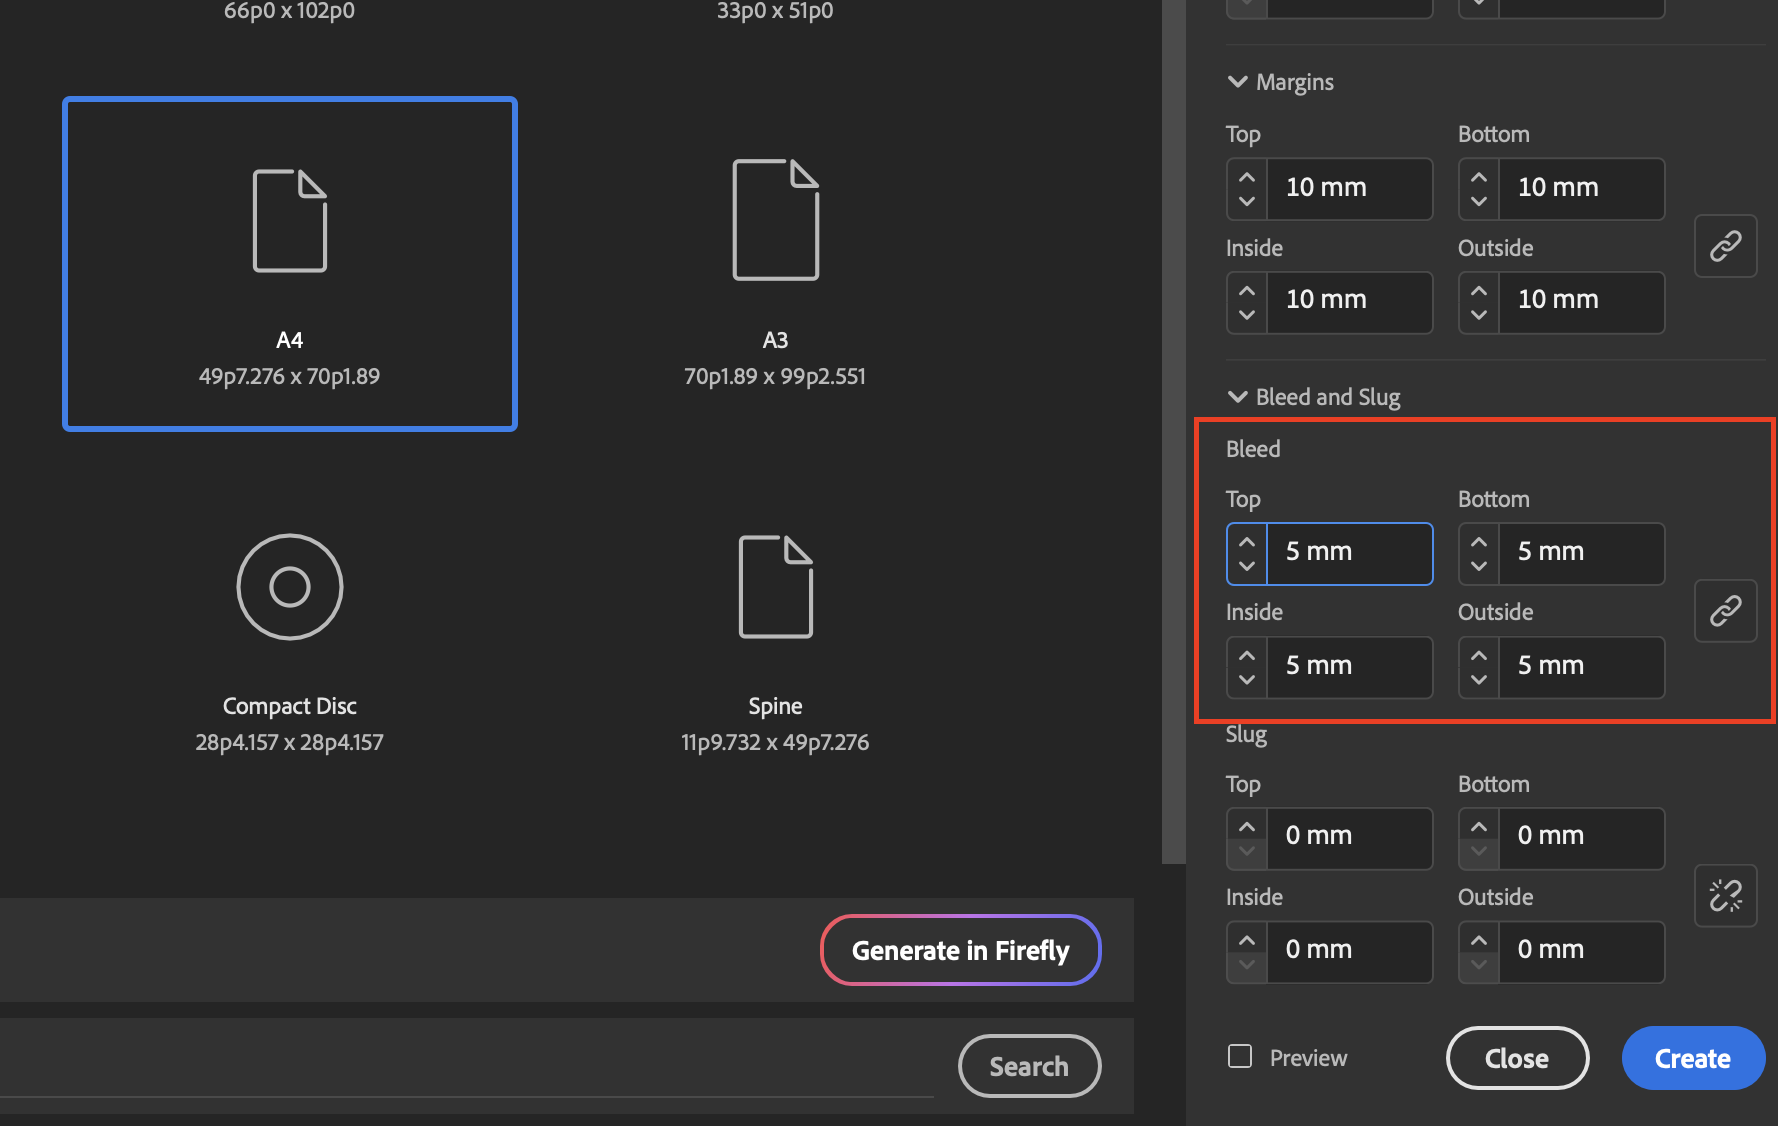
If you've completed all this setup so far, then you're ready to click 'Create' and start designing your magazine!
Things To Keep In Mind When Designing Your Magazine
Always use vector files for logo art
It’s important to make sure that any logos that appear in your printed pages are formatted as a vector. This means that the design of the logo will be made out of lines and dots instead of small pixels, ensuring it stays sharp and clear in the printing process for no pixelation or blur. The most common vector logo formats are .ai, .svg, .eps, .pdf.
Keep your text formatting consistent
Your magazine will naturally have a variety of typography and text throughout it, but it's important to keep things like the body text and even the headings consistent across the publication so that it looks professional and well designed.
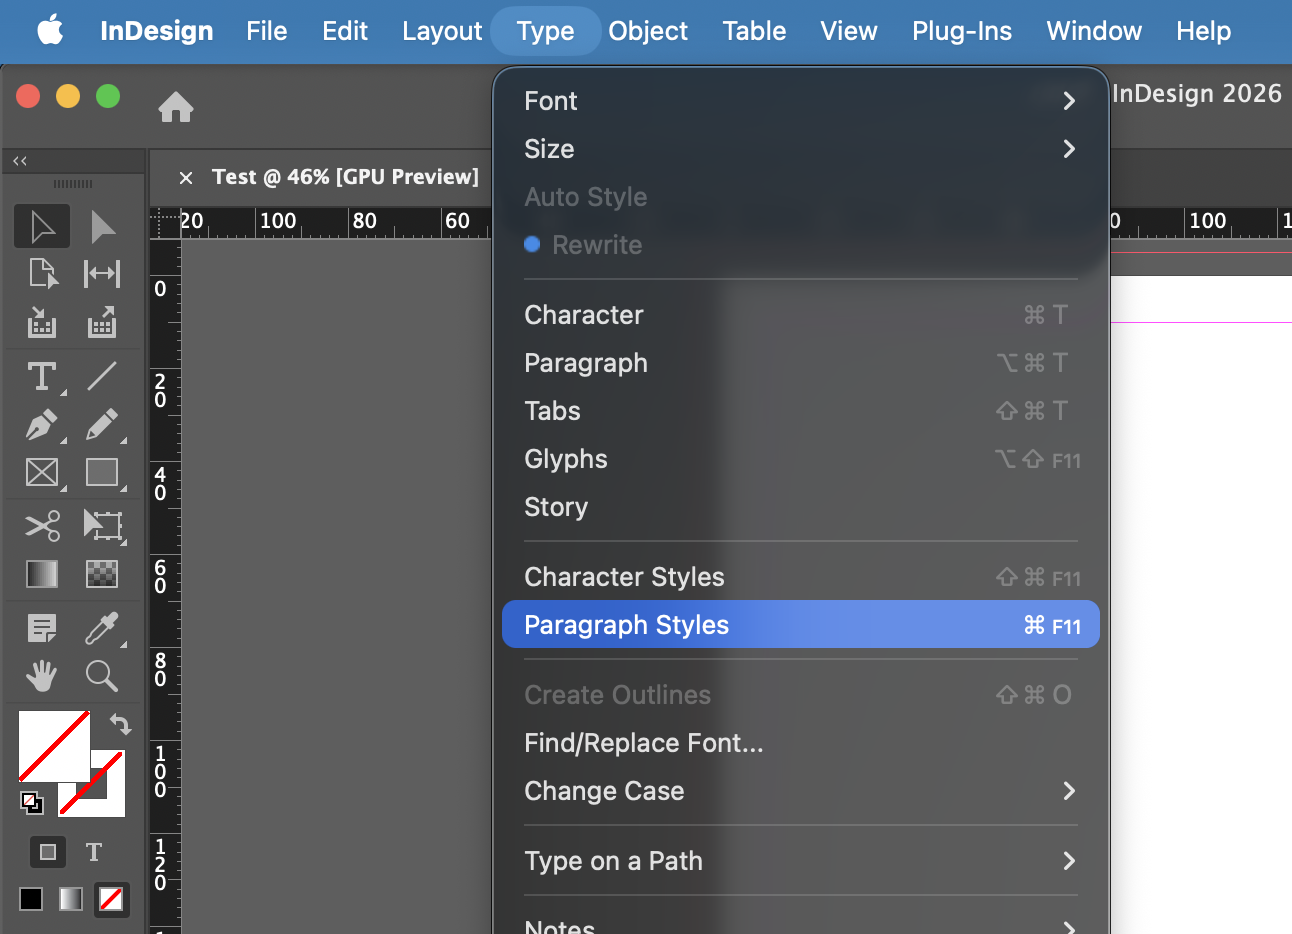
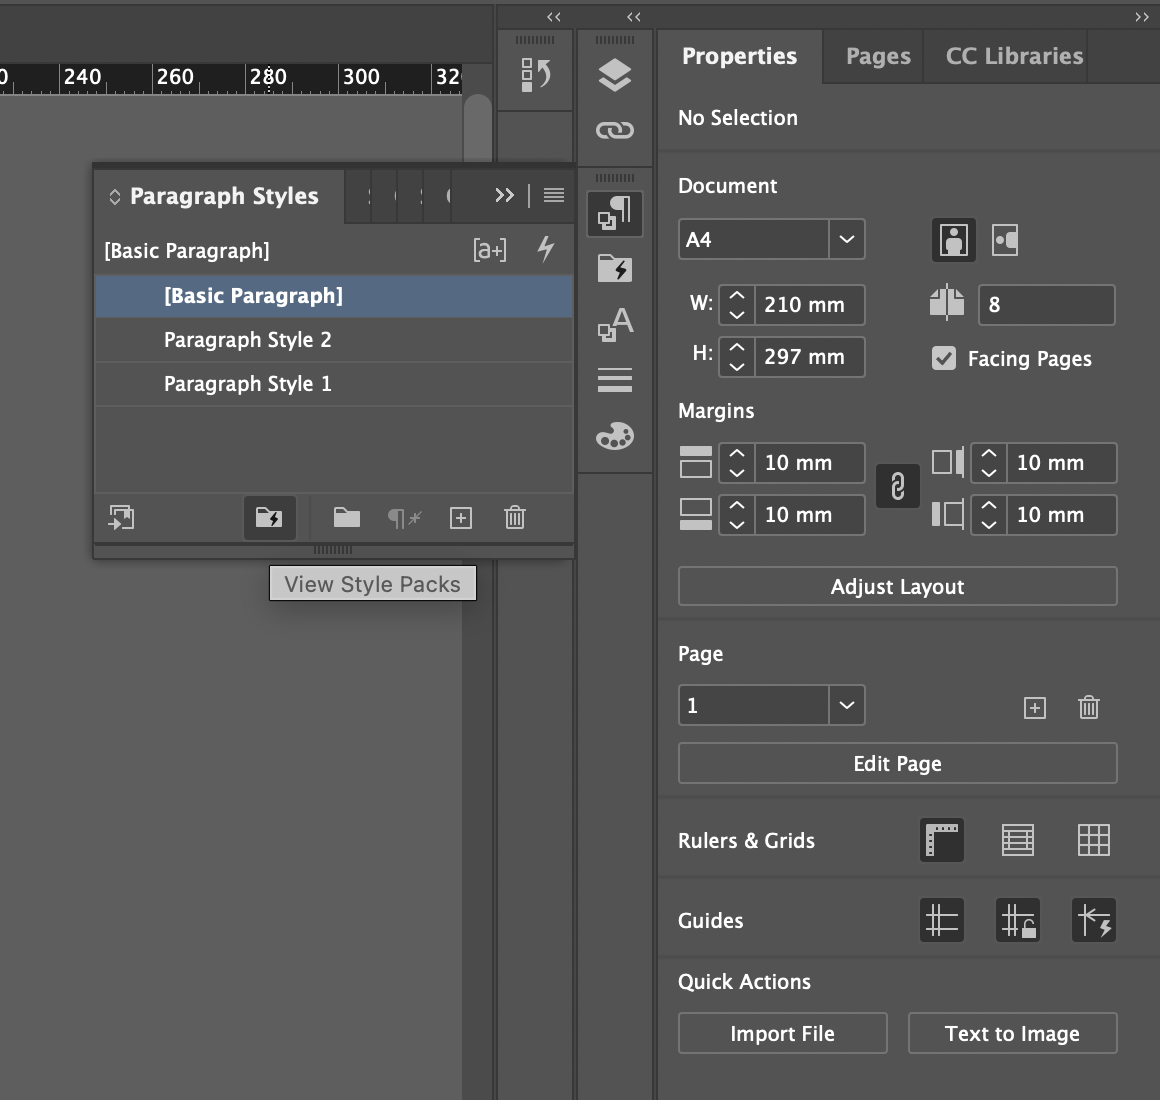
We highly recommend that using the ‘paragraph styles’ feature under Type in the top menu of InDesign when constructing your text or copy on the page of your magazine print file. This is essentially a template shortcut, so that you only have to setup your text to be in the right font size and colour, and if all your text is in the same style, you can later make changes to the style that applies to all the text, rather than just the one paragraph you've clicked on.
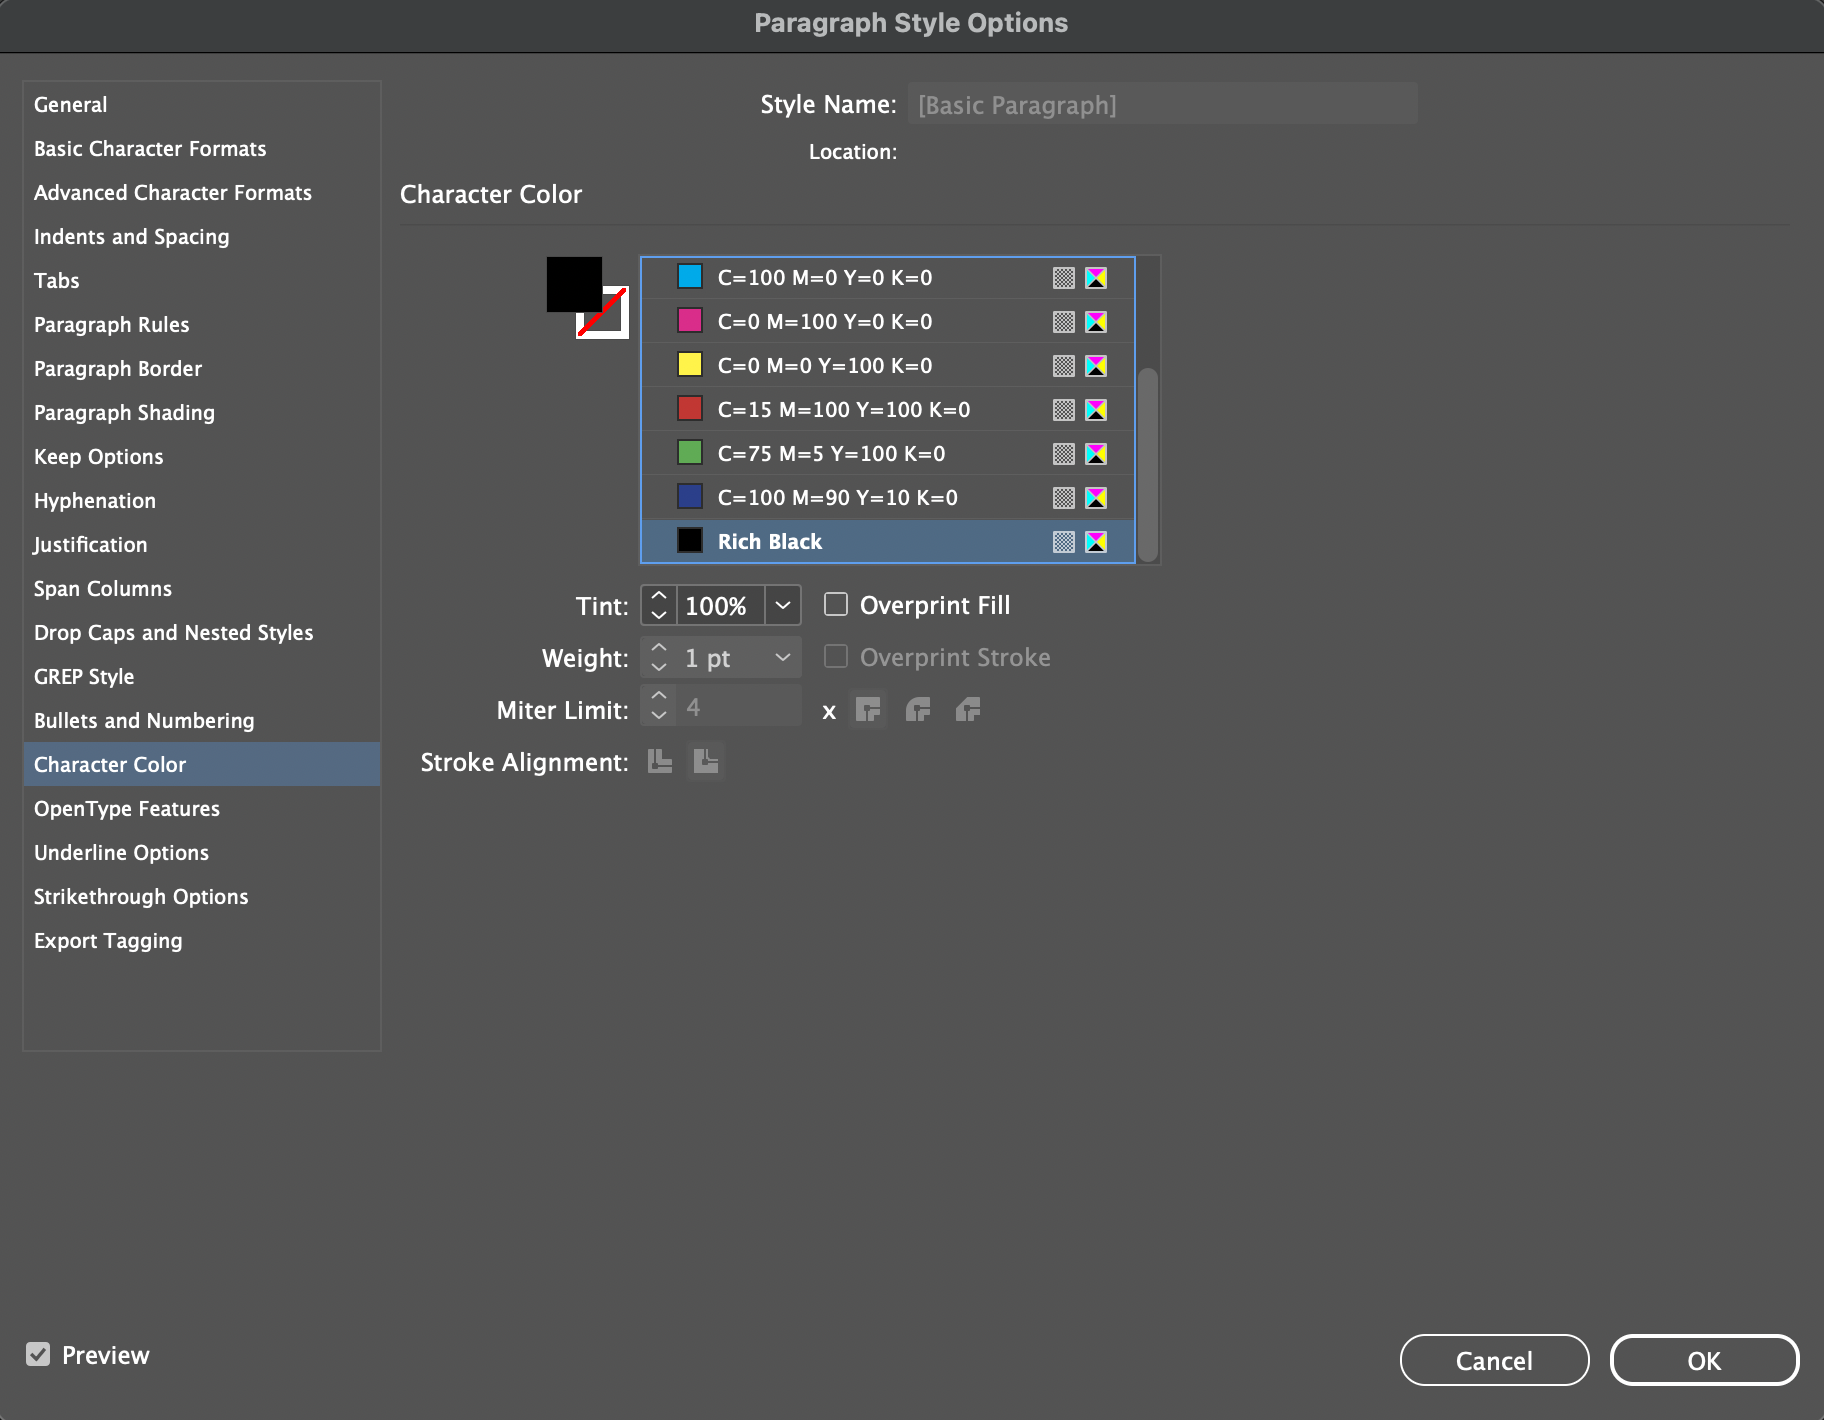
You can have multiple styles as well, so that means a style for your headings, captions, body text, annotations, etc. It's particularly helpful for setting styles like bullet points and later, for updating any black text so that they are configured to print in Rich Black, for a black colour that has greater depth in print.
Use high resolution images
High-quality imagery is a must when putting together your magazine files for the printer. We suggest images that have a minimum resolution of 300 DPI (dots per inch) - this also applies to photos, illustrations and other types of imagery. 300 PI ensures that the visuals in your publication retain their sharpness and produce a professional result when printed. If you're not sure whether the image is high resolution enough, you can look at the details of the image file on your computer or use an online DPI image checker tool.
Convert large text and headlines into outlines
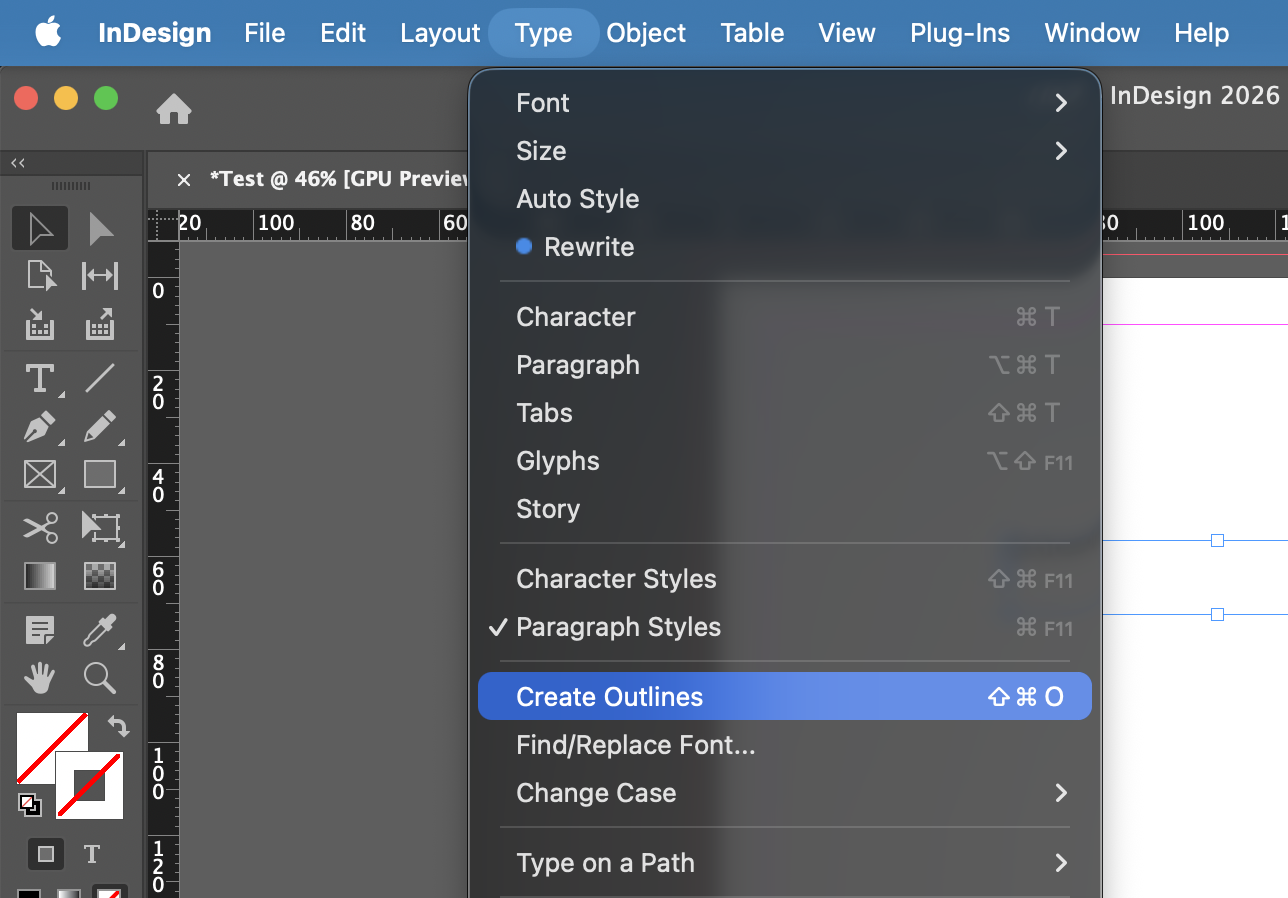
Before hitting that export button, we highly recommend that you first select all your headlines, logo wordmarks or any text that is large and features a particularly unique font, and convert them into outlines. While a correctly exported print-ready PDF will embed the correct fonts, sometimes a particular font will throw things into disarray. Converting text to outlines essentially locks in the look of that font by changing the text into an artwork made up of lines. It transforms into an editable vector shape which means that after conversion, you'll be able to warp the lines, but not change the text like you were able to before. This is why it’s best to do this once all the text is locked in, and only apply it to major pieces of stylised texts in your magazine like headlines and wordmarks. Before converting anything though, we also recommend that you keep a master so you have a copy that's editable if future edits are required.
How To Export Your Magazine File For The Printer
Finally, it’s time to export your magazine files to send to the printer! This is perhaps the most important step to get right, because making mistakes in the export process will impact the entirety of the print file.
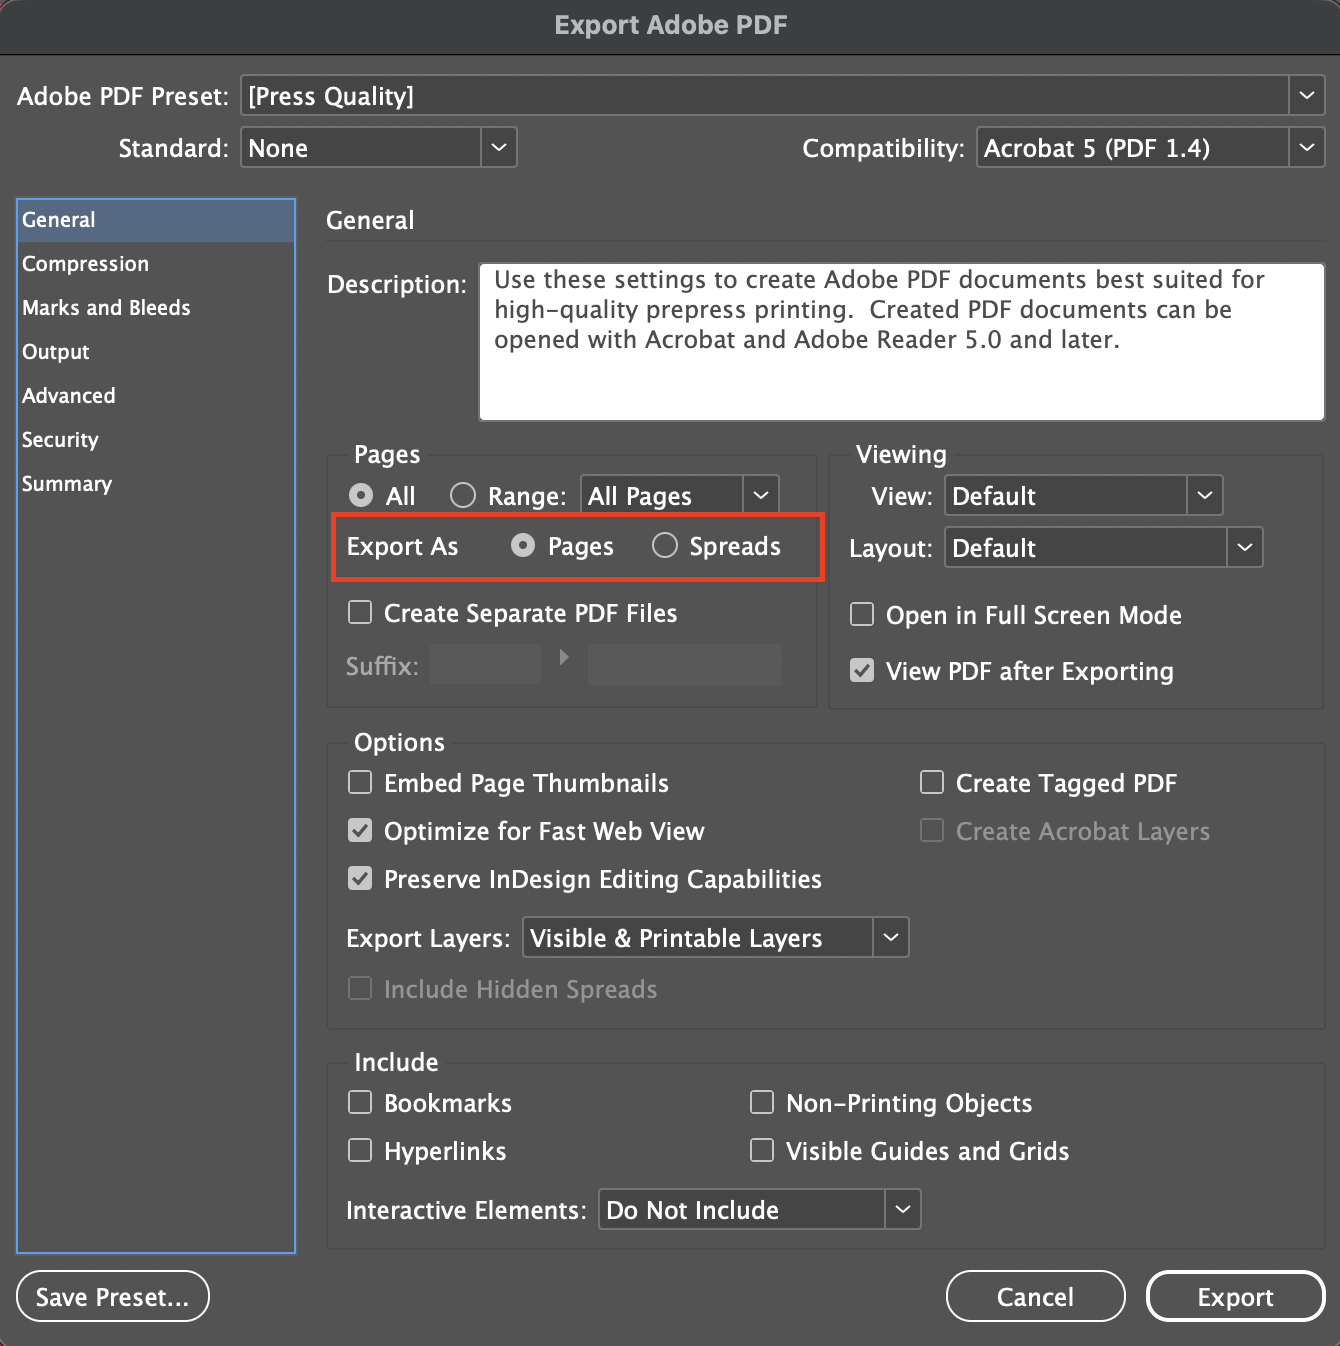
Choose the best export option: Press Quality
Rather than simply clicking export (under File), we actually recommend going with one of the Adobe presets called Press Quality. This will ensure the document is high quality throughout and has a lot of compatible settings by default. Once you've chosen this option and picked a folder to save your file in, you'll then see the below export set up screen, where the most important configuration is whether you'll export as separate pages or spreads. This will depend on your publication's binding method and the printer's specifications.
Compression: Flattening layers and transparencies
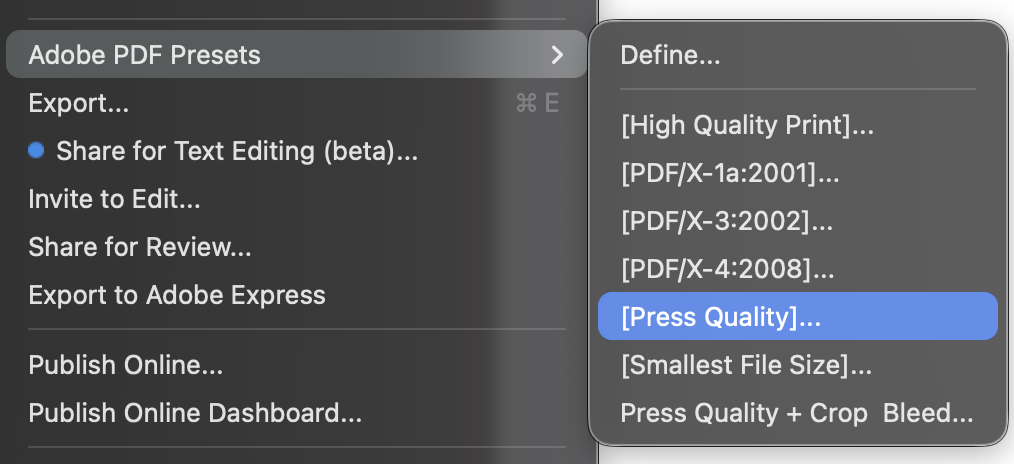
In the next tab (Compression), although it's usually ticked by default, you want to make sure that the option for 'Compress Text and Line Art' is enabled. This is super important, because this setting flattens all your layers and transparencies, embeds all the fonts you’ve used throughout the content to ensure that your final work is one simply layer. This is really important because when the commercial printing machines process the file, everything that's needed for print is there in one spot. If there are many layers, the printer's computer has to process them all and that can cause a long list of issues and at worst, put a printer out of commission for days if the software can't process the file efficiently.
Marks and bleeds: Enable crop marks & bleed
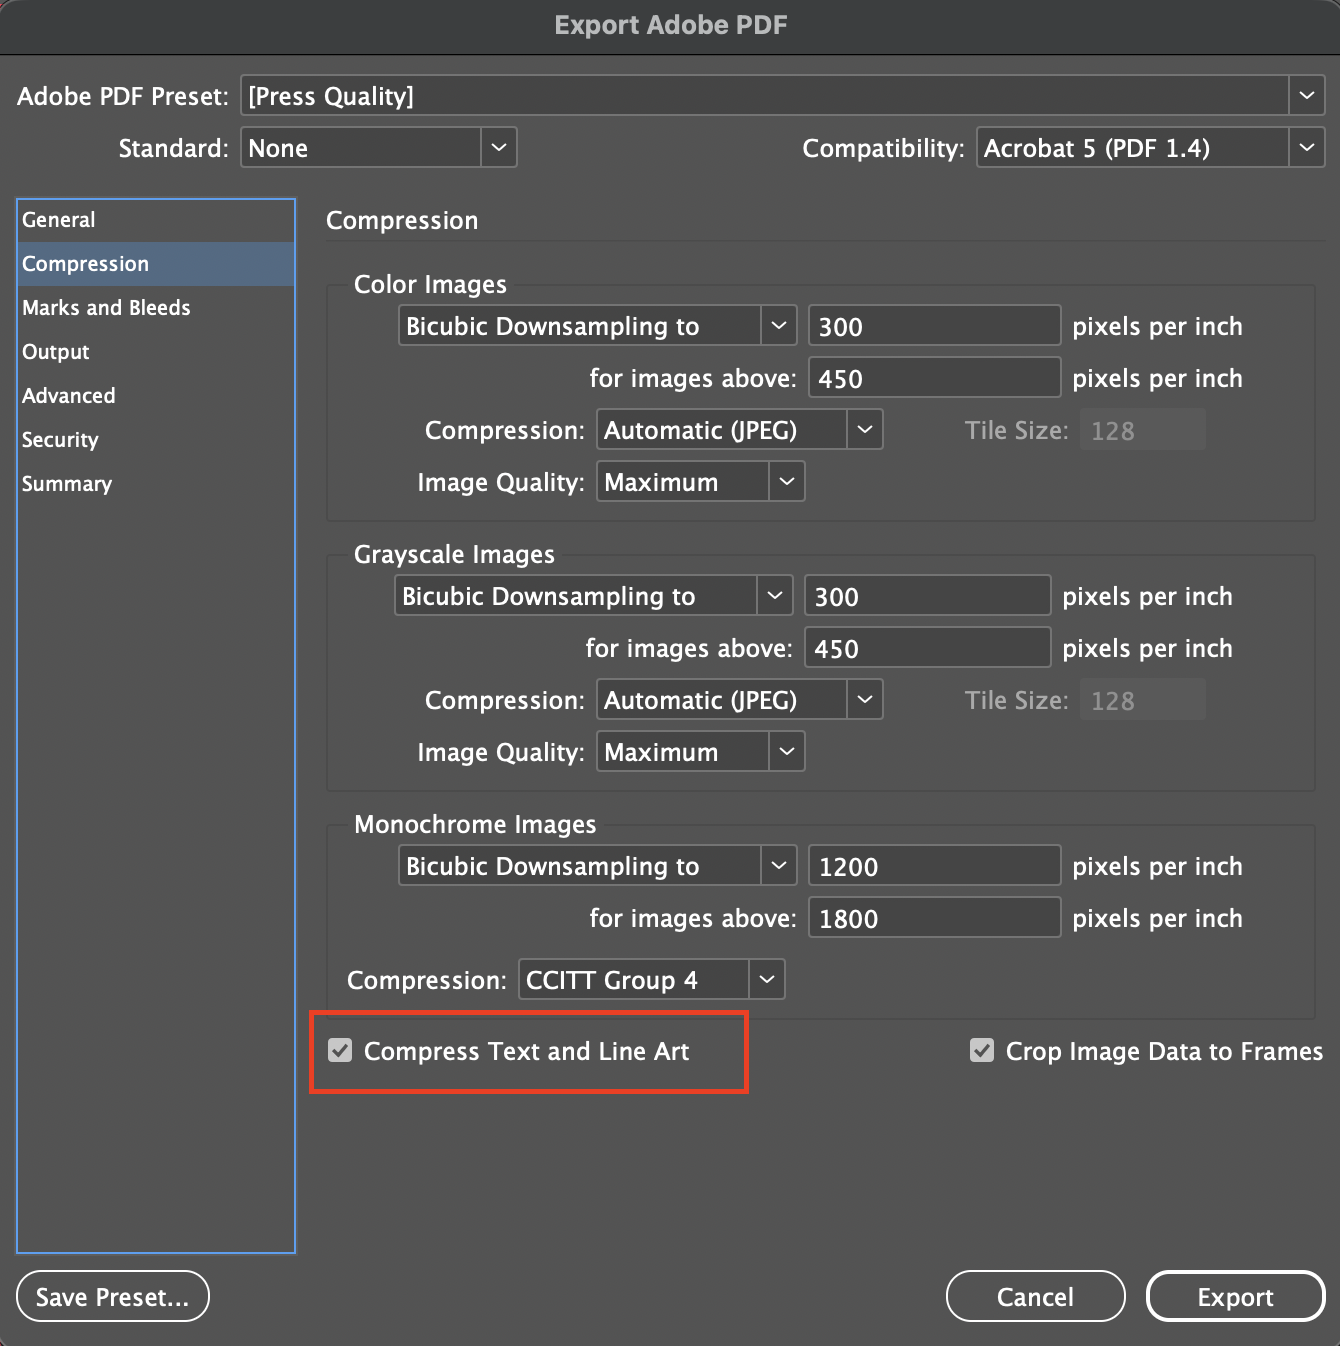
This next tab has all the settings for your bleed and crop marks, and although you set up the bleed before you started designing, you have to make sure that the exported file also includes that same bleed. You'll also want to enable crop marks. This guides your printer during the trimming stage to know where to trim the paper to cut it down to the desired size of your publication.
At FolioFox, we don't require additional marks like bleed marks or registration information, etc, but this will again differ by the professional printing company, so always check their specifications before sending your artwork for print.
Before you click the export button, we also recommend you double-check the Output tab for the Color Conversion setting, to ensure that all the colours are converted to CMYK so that any photos and images used are also converted to CMYK.
Now, you're ready to go! Click 'Export' to create your print-ready PDF.
Print-Ready File Set-Up & Export Checklist
Follow the steps above or reference them later in the quick checklist provided for you below when preparing your magazine file for the printer and you’ll be good to go. We understand that the technicalities of printing can be confusing or overwhelming for first-time publishers (or even veterans), so feel free to reach out to us at FolioFox if you have any more questions about the steps to take to get your publication ready for the printing process.
The Final Checklist:
- Finished trim size in millimetres
- CMYK colour mode
- Facing pages enabled (optional)
- Margins & columns
- Bleed
- Vector files for logos
- High resolution (300 DPI) for images
- Major headlines and stylised text converted to outlines
- Export with 'Press Quality' preset
- Configure to export as separate pages OR spreads
- Under Compression > 'Compress Text and Line Art' is enabled
- Under Marks and Bleeds > Marks > 'Crop marks' are enabled
- Under Marks and Bleeds > Bleed and Slug > 'Use Document Bleed Settings' is enabled
- Under Output > check that the Color Conversion 'Destination' is set to CMYK.
- Click Export!
To learn more about our magazine printing services and get started on your printing journey, get in touch with our team today. We're here to help you navigate the evolving world of magazine printing with confidence.